Organizing Stores
The primary purpose of MobX is to simplify the management of Reactive
State in your application. As your application scales, the amount of state you
manage will also increase. This requires some techniques to break down your
application state and divvy it up across a set of stores. Of course, putting
everything in one Store is not prudent, so we apply divide-and-conquer
instead.
General approach to managing Stores
When you look at the UI on the screen, all you see is a flattened graphic. But
what escapes your eye is the Object Model that brought it to life on the
screen. That Object Model is a tree of Widgets, a hierarchy. Just like the
UI, think of the Reactive State of your application as a hierarchy of Stores.

When you are starting out, a single store is enough to get going. As it grows in
size, you will see that it is accumulating a lot of additional fields and
actions that don't all belong together. It is then time to break it down and
move the related observable state and actions to its own Store. For example,
consider the store below:
abstract class _MainStore with Store {
String title;
String name;
String email;
String phone;
void setTitle(String value) => title = value;
void setName(String value) => name = value;
void setEmail(String value) => email = value;
void setPhone(String value) => phone = value;
}
The above Store is for an app that has the home page that shows the title.
There is a form on the second page that accepts the name, email and phone
values. Even though it's easier to keep the fields together, it's a good idea to
move the form fields to its own Store. That forms a nice conceptual boundary
and helps in breaking the MainStore down.
Think in terms of conceptual boundaries for your stores, aka Cohesiveness.
Let's create a sub-store called PersonDetails and move the fields into it:
class PersonDetails = _PersonDetails with _$PersonDetails;
abstract class _PersonDetails with Store {
String name;
String email;
String phone;
void setName(String value) => name = value;
void setEmail(String value) => email = value;
void setPhone(String value) => phone = value;
}
The _MainStore now looks much simpler to read:
abstract class _MainStore with Store {
String title;
final details = PersonDetails();
void setTitle(String value) => title = value;
}
Note that we are not making the details field into an @observable as its
value is not going to change. The reactive-state that matters is inside the
PersonDetails, which is already marked @observable.
Stores should be made as independent as possible with all of their inputs clearly defined. All their dependencies should be fed in via constructor parameters or through fields. Any external communication that needs to happen from the Store should be done via callbacks. Adopting this approach improves the portability and also simplifies testing.
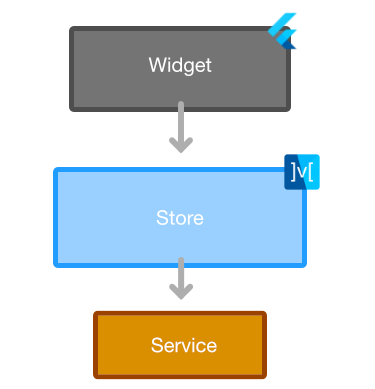
The triad of Widget - Store - Service
The responsibilities of State management can be clearly demarcated across three entities:
- Widget: this paints the visual representation of the reactive-state
- Store: holds the reactive state of the application
- Service: performs work, which can result in a change to the state. Typically this abstracts the CRUD operations to an API or hides details of any stateless worker process.
The dependency order is always top-down from the Widget, through the Store, down to the Service.
This breakdown has a few advantages:
- The
Widgetlayer is primarily stateless and contains a good dose ofObserverwidgets sprinkled wherever the reactive-state is being rendered. You can be as generous as you need to be to with theObserversin selectively observing the state. - The
Storelayer is primarily composed of the@observableand@computedfields. Additionally, you will have the@actionmethods that mutate the observable state. This layer is primarily meant to add the reactivity you need to render the UI. There is no actual work being performed here besides keeping track of the reactive-state. - The
Servicelayer is where you do all the heavy lifting with data. This will include API calls to fetch and send data, format according to the needs of the UI, do data transformations, apply rule-based validation and error checking and so on. All the inputs needed are clearly sent in, making this layer completely stateless!
In short, we have taken cues from the SOLID principles and applied them here :-).
Single Responsibility is the most important attribute of this triad pattern.
Linking Stores
If you organize stores in a hierarchy, you will have a root-Store and then a set of child-Stores that cater to specific features of your application. If the feature is complex, it is possible to have a subtree of Stores. In such a scenario, you will want some kind of communication from the parent to the child stores. There are two common ways of doing this:
- Pass the
Parentinto theChild: This way you have direct access to the public interface of theParentand you can use that to observe certain fields or just invoke parent level functionality for certain operations. It is better to pass the parent into theChild's constructor, rather than setting it as a field.
// parent.dart
class Parent {
  Parent(){
    child = Child(parent: this);
  }

  Child child;
}
// child.dart

class Child {
  Child({this.parent});

  Parent parent;

  void dispose() {
    parent = null;
  }
}
If the dependencies between Stores is much more complicated, let's say each
Store needs a shared instance of the ThemeStore, PreferencesStore,
AuthenticationStore, etc., a better way to manage this is to use the Service
Locator pattern. The ![]() package makes this possible and
is worth checking out.
package makes this possible and
is worth checking out.
- Using callbacks from
Child: Rather than tightly coupling theParentwith theChild, the other option is to have an explicit set of callbacks for the child to communicate with the parent. This is useful when the direction of communication is mostly fromChildtoParent.
class Parent {

  /* ... */

  void addChild() {
    final child = Child();
    child.onChange = (value) {
      print(value);
    };
  }
}

class Child {

  /* ... */

  void Function(String) onChange;

  void perform() {
    if (onChange != null) {
      onChange('value changed');
    }
  }
}
Store lifetimes
Most stores should be created before rendering the UI. This includes your core
application stores, preferences, translations, themes, etc. However, there are
cases where a store should exist only for the lifetime of a screen. For example,
a FormWidget that only needs a store for validation and for loading some
dynamic data. Once the FormWidget is disposed, the store also goes away.
For such cases, you should create the store in the initState() of the
State<FormWidget> and dispose inside the State<FormWidget>'s dispose().
class FormWidget extends StatefulWidget {
const FormWidget();
_FormWidgetState createState() => _FormWidgetState();
}
class _FormWidgetState extends State<FormWidget> {
FormStore store;
void initState() {
super.initState();
store = FormStore();
store.setupValidations(); // setup some reactions
}
void dispose() {
store.dispose(); // dispose the reactions
super.dispose();
}
Widget build(BuildContext context) { /* ... */ }
}
Using Providers to avoid Singletons
The provider-pattern has become a standard way of making the top level stores
available across the entire app. It avoids creating a singleton-Store, making
it easier to use the Store as a plain class instance.
Using the ![]() package on pub, you can setup a
repository of stores at the App level. Then using the
package on pub, you can setup a
repository of stores at the App level. Then using the Provider.of<T>() API,
you can read this value inside your Widget.build() methods.
In the example below, we are setting up a store at the app-level:
class MyApp extends StatelessWidget {
Widget build(BuildContext context) {
return MultiProvider(
providers: [
Provider<MultiCounterStore>(create: (_) => MultiCounterStore())
],
child: MaterialApp(
initialRoute: '/',
theme: ThemeData(
primarySwatch: Colors.blue,
),
routes: {
'/': (_) => ExampleList(),
}..addEntries(
examples.map((ex) => MapEntry(ex.path, ex.widgetBuilder))),
),
);
}
}
Then inside a nested widget, deep inside, you can retrieve the store with the
Provider.of<T>(BuildContext context) API. You will do this in the build
method of the Widget, where the context is available.
class CounterListPage extends StatelessWidget {
const CounterListPage();
Widget build(BuildContext context) {
final store = Provider.of<MultiCounterStore>(context);
return Observer(
builder: (_) => Column(children: <Widget>[
RaisedButton(
onPressed: store.addCounter,
child: const Text('Add Counter'),
),
]));
}
}
Using ProxyProvider with a service
For handling when a store depends on a service, the ProxyProvider API can be
used
class MyApp extends StatelessWidget {
const MyApp(this._sharedPreferences);
final SharedPreferences _sharedPreferences;
Widget build(BuildContext context) => MultiProvider(
providers: [
Provider<PreferencesService>(
builder: (_) => PreferencesService(_sharedPreferences),
),
ProxyProvider<PreferencesService, SettingsStore>(
builder: (_, preferencesService, __) =>
SettingsStore(preferencesService)),
],
child: Consumer<SettingsStore>(
builder: (_, store, __) => Observer(
builder: (_) => MaterialApp(
initialRoute: '/',
theme: ThemeData(
primarySwatch: Colors.blue,
brightness:
store.useDarkMode ? Brightness.dark : Brightness.light,
),
routes: {
'/': (_) => ExampleList(),
}..addEntries(
examples.map((ex) => MapEntry(ex.path, ex.widgetBuilder))),
),
),
));
}
Here, the ProxyProvider API allows us to declare that SettingsStore depends
on an instance of the PreferencesService class and will ensure the objects are
constructed in the appropriate order based on the chain of dependencies. Note
that in this particular example, we have used the Consumer widget that is an
alternative to using Provider.of<T> for retrieving a value. Whilst this adds
an additional level of indentation, some may prefer this approach as it's
declarative and assists in building a mental model where a value provided so
that can be consumed further down in the widget tree. Furthermore, it
facilitates in writing code where dependencies can be more explicit. The
following is a widget that depends on the SettingsStore
class SettingsExample extends StatelessWidget {
const SettingsExample(this.store);
final SettingsStore store;
Widget build(BuildContext context) => Scaffold(
appBar: AppBar(
title: const Text('Settings'),
),
body: Observer(
builder: (context) => SwitchListTile(
value: store.useDarkMode,
title: const Text('Use dark mode'),
onChanged: (value) {
store.setDarkMode(value: value);
},
),
));
}
Using a non-default constructor here allows us to explicitly declare that the
SettingsExample class depends on the SettingsStore for it to function. Some
developers may already be familiar with structuring code this way when working
with applications/frameworks that support constructor injection. An instance of
the SettingsStore is passed through the Consumer widget as per the example
code below
...
Example(
    title: 'Settings',
    description: 'Settings for toggling dark mode',
    path: '/settings',
    widgetBuilder: (_) => Consumer<SettingsStore>(
      builder: (_, store, __) => SettingsExample(store),
    ),
  )
...
A side effect of this is that writing widget tests become easier as well. Since
the widget's dependencies have been made explicit, we could pass mocks (e.g.
using the ![]() package) of said dependencies if required.
package) of said dependencies if required.
A variety of providers
There are multiple types of Providers available in the
![]() package. The ones most relevant and useful to MobX are:
package. The ones most relevant and useful to MobX are:
Providerfor constructing and disposing objects on the fly. This is good when the object has a fixed lifetime.Provider.value, aProviderconstructor for single values, known before handProxyProviderfor constructing objects that depend on other objects e.g. a store depending on a serviceMultiProviderfor passing multiple values